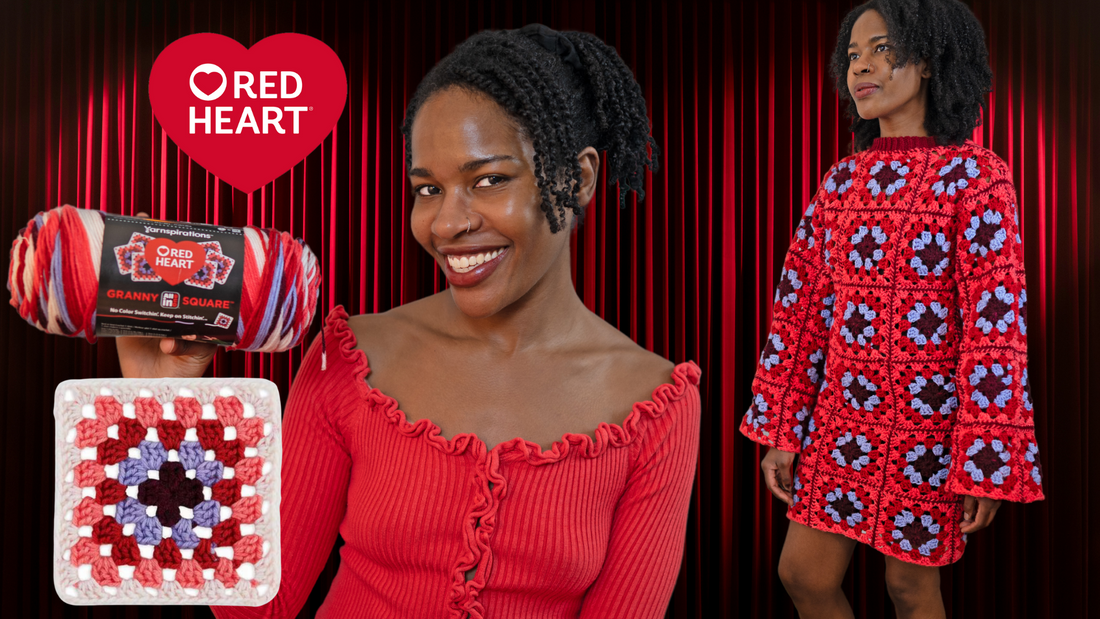
Review of the ALL IN ONE Red Heart Granny Square Yarn
There is this yarn that I have seen all over my Pinterest and YouTube feed lately and it is the Granny Square ALL IN ONE Red Heart Yarn by Yarnspirations. It is quite revolutionary because it allows you to create a complete a continuous granny square without tying off and weaving in the ends.

In general, I don't really have a problem with weaving in the ends because I tend to do it as I go, but I really LOVED the concept of this yarn and so I decided to give it a try. I would never complain about having a few less ends to weave in, so I decided to give it a try.
This yarn has been flying off of the shelves and was quite hard to find, but I managed to see a few skeins in the color Hot Stuff that was on sale at JoAnn's Craft Store.
I was drawn to the colorway of this yarn as it included some yarn color choices I probably wouldn't have paired together myself, but I really loved them together. This colorway includes maroon, periwinkle, bright red, hot pink and white, and together I felt that these colors were perfect for a Valentine's Day project since it is around the corner. So I bought 6 skeins in total to create some projects with.


The pattern for the granny square that should be used is inside of the label. So I decided that even though I tend to make granny squares a bit differently, I am going to follow the exact pattern mentioned inside of the label in order to see if the yarn matches up properly.
My first impression was that the rows surprisingly matched up quite well. I tend to have a tighter tension, which seemed to help me when working with this yarn. The row that I seemed to have the hardest time with is the third row, I usually would size up to a 6mm hook in order to get it to match up more better.
If you are a beginner at crochet or have looser tension, I could see this yarn being impossible to work with. It did save me time with weaving in the ends, but the amount of time I had to spend reworking rows made me wonder if I was actually saving time. This yarn is a bit more on the expensive side for Red Heart costs $9.99 for 417 yds / 381meters per skein. I got it on sale for $6.49, but a typical Red Heart Super Saver Jumbo skein is $9.49 for 744 yds/ 681 meters. So, personally I would probably stick to the typical jumbo skein because you get almost double the amount of yarn.


So I began crocheting as many squares as I could and found myself crafting a whopping 68 granny squares for my project. However, due to the unsightly splotches in the last white row of this yarn, I made the decision to exclude it from my work. Regrettably, this meant that approximately 1/5 of the yarn from this skein was rendered unusable for this particular project. Nonetheless, I made sure to wind all the yarn into cakes using my yarn winder as I worked through the squares, ensuring it's primed for future use in a scrap yarn project.

When seaming together the front and back panel, I used this single crochet stitch method to seam together the bottom four rows of granny squares and worked a shoulder seam along the three top clusters of 3 dc. This technique ensured a seamless and sturdy construction for the dress.


Then I seamed together the sides of both arm panels and connected them to the body of the dress using that same single crochet stitching method. As I did this I noticed there was a gap underneath bottom of both sleeves. To close it, I turned the garment inside out and stitched it together with an invisible stitch, but that is the extent of the sewing I did on the project besides sewing in the ends.


Once I completed all of the seaming and sewing, I wanted to give this mini dress one final touch - a knit-like looking collar. So, I worked a slip stitch in the back loop only collar all the way around. To begin, sl st into the very middle st in the back panel of the collar I worked 8 chs, turn your work, then starting in the 2nd ch from the hook, work a sl st across the row, sl st into the next two sts along the collar.

*Now, turn your work, and sk the first 2 sts (along the base of the collar), and work a sl st into the blo of each st (7 sl sts) across the row. Then, ch 1, turn your work, and work a sl st in the blo across the row, and sl st in the next two sts at the base of the collar**. Now repeat steps * to ** all around the collar and to finish it off, sl st the first row to the last row with a sl st in the blo along the inside of the collar, and weave in the ends. After completing all the stitching and assembly, this is the final result of the dress.

This was one of my favorite projects to make so far, although it required many hours of love - it was totally worth it!
I still have quite a few granny squares left over from this project and need to decide what else to make with it, so I will be having another community poll on the YouTube Channel to ask you all your thoughts on what else I should make.
If you are curious about what other projects to make with granny squares, feel free to check out my 50 Granny Square Crochet Pattern Projects video below.
📸 Tag me at @cactusladycreation on social media platforms if you create any of the patterns mentioned in this blog post! I would love to share your work with our growing community!
Your support means the world, and I can't wait to share more crochet adventures with you very soon. Until next time, happy crafting, and I'll see you in the next one! 🌟🧶💕
@cactusladycreation