Crochet Inspiration: Sea Witch / Dark Mermaidcore Aesthetic!
Welcome to the mesmerizing depths of the Sea Witch aesthetic, a style that lets you explore the enchanting allure of the ocean and its mystical inhabitants! It is the edgy and darker sister to mermaidcore. I have also heard this aesthetic called, dark mermaidcore, sirencore, and mermaid grungecore. If you've ever daydreamed about the siren's call of the sea, this aesthetic is tailor-made for you. So, grab your tridents and seashell crowns as we dive into the whimsical and magical world of Sea Witch!


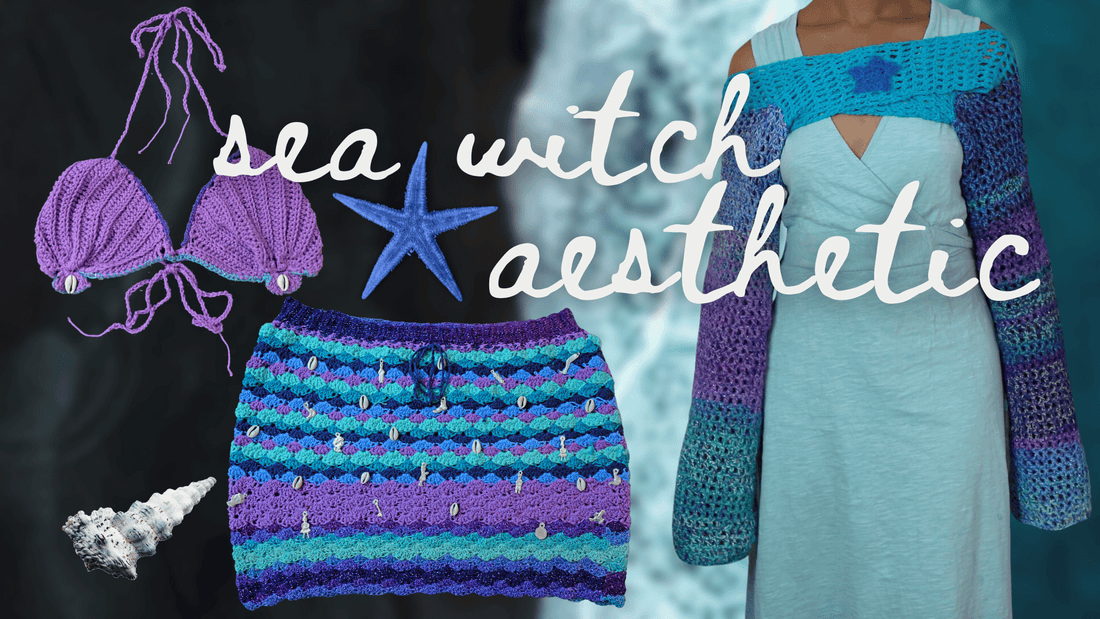
Colors that make waves:
Picture yourself surrounded by the breathtaking colors of the ocean—blues, greens, teals, and purples. This aesthetic embraces these captivating shades, bringing the marine world to life in every outfit. Whether it's a deep, mysterious hue or a shimmering, iridescent tone, these colors will have you feeling like the ruler of the sea!
Accessorize with the gems of the sea:
Glistening seashells and luminous pearls are the treasure troves of the ocean, and they're not just reserved for mermaids! Embrace this style by accessorizing with these beautiful marine gems. From delicate shells to a pearl beads, let the sea's bounty add an extra touch of magic to your ensemble.
Unraveling Enchantment and Mystery:
The Sea Witch aesthetic not only celebrates the beauty of the ocean but also delves into its enchanting mysteries. With themes of sea curses, legends of lost ships and sailors, and the dichotomy of beauty and danger, this aesthetic is a delightful blend of magic and intrigue. I also plan on exploring some of these stories along with the essential sailors knots and their stories in a blog post really soon - so keep an eye out for that!
Let's dive into the enchanting world of Sea Witch aesthetic with three beginner-friendly crochet patterns that will help you channel your inner sea enchantress. The best part? These patterns are freehand, so you can easily customize them to fit your own measurements, making them as unique as the ocean's mysteries themselves! 🐚🌊
Get ready to embark on a crochet adventure where we'll turn yarn into the graceful curves of mermaid fins!🧜🏾♀️


Crochet Shell Bikini Top:
To begin, let's cast our crochet spell with a slip knot and ch 15. (Or feel free to ch more or less depending on the size of your chest here)
Row 1: Now, work half double crochet in the 3rd ch from the hook, creating 13 lovely hdc stitches.
Row 2: With a wave of our hook, let's ch 1 and turn our work. This time, we'll work hdc in the blo across the row. But wait, we're not done yet—let's increase in the last stitch, leaving us with 14 hdc stitches in total.
Row 3: Now, it's time to add more waves to our creation! Ch 1 and turn again. For some extra magic, work 2 hdc in the blo in the first stitch, and then double crochet across in the blo. Watch as we reach 15 hdc stitches!
Row 4: The sea's rhythm flows through us as we ch 1 and continue to work hdc in the blo across the row. For the final touch of this row, let's work 2 hdc in the last stitch, bringing the total to 16 sts.
Repeating patterns is like a dance of the ocean waves! From row 5 to 12, follow the same steps of row 3 and 4 to craft 12 rounds of sea-inspired magic. And don't forget, each increasing round should have one more st until round 12, which should have 24 sts just like the beautiful treasures beneath the sea.
Now, it's time to embark on the journey of decreasing stitches and create the enchanting shape of our Mermaid Shell Bra Cup.
Row 13: Channel the ocean's serenity as we work hdc in blo of each stitch across, keeping 24 sts in our magical creation.
Row 14: Ready to add more depth to our design? Let's ch 1 and turn our work. Work hdc2tog in the blo of first 2 sts, and then hdc in blo across, leaving us with 23 sts like a mermaid's secret.
Row 15: But wait, we're not done just yet. Turn the tide with another ch 1 and turn. Now, work hdc in blo each stitch, and in the last stitch, perform the magical hdc2tog, leaving us with 22 stitches in our sea-inspired masterpiece.
Like the ebb and flow of the tides, for row 16 to row 24 we'll repeat the same steps of rows 14 and 15, letting the beauty of our design unfold stitch by stitch.
Now that we've crafted the main body for one bra cup, let's add the finishing touches to make it truly extraordinary.
Bottom of Shell:
Round 1: With a flourish of our hook, let's work a single crochet along each row in the bottom (flat side of the piece). Insert hook in side of the 1st row, ch 1, turn, and work a single crochet in each stitch across, and voilà, we now have 26 sc sts in our creation!
Round 2: When we reach the end, chain 1, turn, and create a magical connection by hdc9tog, then hdc8tog, lastly hdc9tog to finish the row.
Round 3: Finally, let's shape the iconic cockle shell by working a ch 4, turn, and work 9 tr crochet stitches in the middle stitch (hdc8tog of previous row). Ch 4 again and perform a graceful slip stitch into the ring. One final step—sl st into the chain at the edge, tie off, weave in ends!
Behold, our Mermaid Cockle Shell Bra Cup is complete, a stunning creation inspired by the Sea Witch Aesthetic! Use the same pattern to create another shell.
Connect Cups Together:
Then, join both shells together by sl st into one cup, ch the amount of chs needed to fit the space in the middle of your chest, then sl st into the other cup. Ch 1, turn and work sc in each ch across, sl st back into the 2nd st in other cup, tie off, weave in the ends. Finish off by working 3 sc in each stitch along the top of the bra cups and a sc along the bottom of the shells in contrasting colors.
With the power to customize the measurements, this freehand crochet pattern allows each of us to weave our own tale of enchantment and beauty. So, take up your crochet hooks, let your imagination flow like the tides, and create a mermaid-inspired masterpiece that's truly one-of-a-kind! Happy crocheting! 🧜♀️🌊✨

Divine Waves Miniskirt:
This freehand crochet pattern allows you to create a mesmerizing mini skirt that embraces the magic of the ocean. Plus, with customization options to fit your measurements, you'll be dancing to the rhythm of the sea in no time!
To Begin: Work the amount of chs that fit comfortably around the widest part of your hips. Sl st into the first ch.
Round 1: ch 1 (does not count as a st), work hdc in same st, work hdc in every st around, sl st into the beginning ch 1.
Round 2: ch 1 (does not count as a st), work sc in same st, sk next st, *work 5 dc in next st, sk next st, sc in next st* repeat the steps between the * around.
Round 3 : Now, we're going to create divine waves in our design; ch 3 (counts as dc), work 4 dc in same st, *sk next 2 sts, work sc in next st, sk next 2 sts, work 5 dc in next st* repeat the steps between the * around.
Round 4 and Beyond: Keep riding the waves until your skirt reaches the length you desire by repeating round 3 until the the skirt reaches the length that you desire. When you're ready, tie off the yarn and weave in the ends, securing your creation.
Creating the Waistline:
Insert yarn into back top of the skirt, then chain as high as you’d like the waistline to be. I worked 10 chs here, but feel free to work more or less according to your desire. Then in the 2nd ch from the hook, work a sc, continue working sc in each ch across the row.
*When you get back to the bottom of the row (which is the top of the skirt), sl st into the next 2 sts ( or more or less depending on how tight you would like the waistband to be), then ch 1, turn your work, and work sc in blo in each st across, ch 1, turn and work sc in blo back across the row* Continue repeating the steps between the * for the rest of the waistband. Turn your work inside out and connect the waistband together with a sl st seam.
Creating the Drawstring:
Now, it's time to add the finishing touch—an enchanting drawstring to complete your Divine Waves Miniskirt. Chain 100 (or your desired length for the drawstring), and weave these chains through the row of half double crochet, which was the first row of the skirt. This drawstring will add an extra touch of magic and allow you to adjust the fit of your skirt with a flourish! Embellish your design with a shell beads and metallic charms to give your piece a personal touch.
There you have it, your Divine Waves Miniskirt is complete, ready to bewitch all who lay eyes on it with its Sea Witch charm. So, embrace the sea's enchantment, and let your crochet hook lead you to a world of magic and style! Happy crocheting, sea enchantress!

Starfish Shrug:
Ahoy, sea enchantresses! Prepare to craft the most captivating and whimsical Mesh Stitch Sleeves, adorned with a mesmerizing Starfish Appliqué for your enchanting shrug. Let's cast our crochet spell and dive into this freehand pattern, where creativity knows no bounds, and the magic of the Sea Witch aesthetic comes alive!
Crafting the Mesh Stitch Sleeves:
To Begin: Work a slip knot
Round 1: ch 68, sl st into first ch, feel free to adjust the number of chains according to your desired width for the sleeves, as we embrace the magic of customization.
Round 2: ch 4 (counts as a dc and ch 1); *sk 1 st, work 1 dc, ch 1, repeat * around, sl st in ch 3 (34 dc & 34 ch-1 spaces).
Round 3: Continue the magic by repeating the steps from Round 1 for the rest of the rounds. Let the mesh stitch panel grow until it reaches your desired length for the sleeves.
Don't forget to create two sleeves for the ultimate sea enchantress look!
Crafting the Front Panel:
To shape the captivating Front Panel, use markers to block off 10 stitches along the top of each sleeve. This will guide you as you crochet the magical mesh stitch.
Row 1: Sl St yarn into first st, ch 4 (counts as dc & ch 1) *s k 1 st, work dc in next st, repeat * until next marker (10 dc & 10 ch-1 spaces). For an enchanting touch, ensure that the double crochets align directly above the ones in the sleeve to truly execute the mesmerizing mesh stitch.
Row 2: ch 4 (counts as dc and ch 1), turn work * sk 1 st, dc in next st, ch 1, repeat * across row
Repeat row 2 for the rest of rows, work 24 rows in total (feel free to work more or less here to fit the width of your chest. Tie off and repeat the same steps to work a front panel on the other sleeve.
Connecting the Front Panels to the Sleeves:
With both Front Panels complete, it's time to create a mesmerizing X-like fashion by crossing them over each other. Use markers to block off 10 dc in the sleeves to connect the panels on both sides. Feel the magic as you pin them together and try them on to ensure the perfect fit.
Now, work an invisible seam to connect the panels to the sleeves. Let the sea's guidance lead you in this magical task, and watch the enchanting shrug come to life before your eyes!
Back Panel:
Insert yarn into the last st in the front panel
Row 1: ch 4 (counts as dc and ch1), * sk 1 st, dc in next st, ch 1, repeat * 3 more times.
Row 2: ch 4 (counts as dc and ch 1, *sk 1, dc in next st, ch 1, *repeat 3 more times.
Row 3 and onwards: repeat steps in row 2 until there are 20 rows, or as long as you’d like to go to fit the width of your back.
Connect the panel to the sleeve with an invisible stitch on the inside of the garment. Tie off and weave in the ends.
How to create Starfish Appliqué for the front of the Shrug:
To begin work a Magic Ring
Round 1: ch 1 (counts as a dc), work 9 dc in the magic ring, pull the end to tighten the ring, sl st to top of ch 3
Round 2: ch 1, dc in same st, *[work 2 dc, tr, ch 2 and sc in top of tr (picot), work 2 dc all in same st, work sc in next st *
Repeat steps between * around and weave in the ends.
Then sew the starfish to the front of the shrug but working a running stitch along the edges of the star. Tie off the yarn and weave in the ends, ensuring your masterpiece is polished and ready to enchant all who behold it.
There you have it, dear sea enchantresses—your Divine Mesh Stitch Sleeves and Starfish Appliqué Shrug is now complete! You've woven magic into every stitch, creating a one-of-a-kind piece that captures the allure of the ocean and the charm of the mermaid world. So, let your creativity soar, and embrace the enchantment of the Sea Witch aesthetic with every stitch you crochet.
Happy crafting, magical mermaids! 🧜♀️🌊✨
Share your new Creation
Tag me online: @cactusladycreation #consciouscraftingcommunity