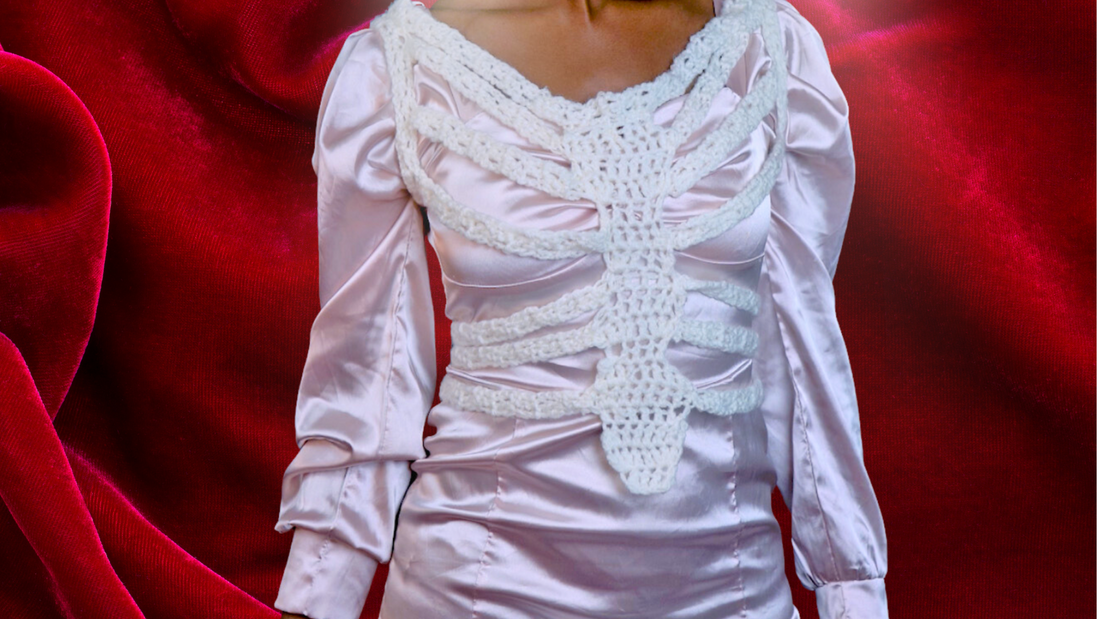
Skeleton Harness Crochet Pattern
Hello, my fellow crochet lovers and admirers of all things macabre! Lately, I've noticed skeleton-inspired pieces popping up all over my Pinterest feed, so I couldn't resist developing my own pattern to share with you all.
In this blog post, I'll guide you step-by-step through the creation of a stylish Crochet Skeleton Harness! So, grab your hook, settle in, and let's get crocheting together!
Materials:
yarn: super saver in soft white
Sewing Clips or Markers
5.5mm crochet hook
Embroidery Needle
Techniques:
ch(s): chain(s)
dc: double crochet
Invisible Stitch
sk: skip
sl st: slip stitch
st (s): stitch (es)
Skill Level:
Intermediate
Yardage Estimate:
XS 2.5 oz / 70 grams ≈ 132 Yards (120 m)
Wanting an AD-free Pattern?
Check it out HERE!


Notes:
- Begin by creating the back panel and front panel.
- Then work the ribs, collar, and arm strap pieces to have 3 dc in each row, but each piece will be different lengths. There is an exact stitch count guide for sizes XS to 5 XL, however feel free to adjust to fit your exact measurements by working more or less rows for each section of the piece.
- I suggest using sewing markers to hold everything in place before sewing each piece, to make sure that everything properly lines up. It is also great to try it on as you sew to make sure it fits properly.
- This piece is rated Intermediate because of all of the sewing, but if you are a confident beginner, I think this is a totally doable project to tackle.
- All ch 3 in this pattern counts as a dc.
- Gauge: 2 rows of dc ≈ 1.5 inches / 4 cm length. Feel free to adjust size your hook up or down in order to meet this gauge.
- The sizes featured in this pattern are XS, S/M, L,XL, 2XL/3XL, 4XL/5XL and are determined using the Craft Yarn Council Standard.
Back Panel:
To Begin: ch 5

Row 1: dc in 4th ch from the hook, dc in next 2 sts (3 dc).

Row 2: ch 3, turn, 2 dc in 1st st, 1 dc in next, 3 dc in last (7 dc).

Row 3: turn, sl st in 1st, 2nd and 3rd st, ch 3, 1 dc in next 2 sts, sk last 2 sts (3 dc).

Row 4: ch 3, turn, 1 dc in next 2 sts (3 dc).

Row 5: ch 3 turn, dc in same st, 2 dc in next 2 sts (6 dc).

Row 6: ch 3, turn, dc in same st,1 dc in next 4 sts, 2 dc in last st (8 dc).

Row 7: ch 3, turn, dc in each st across (8 dc).

Row 8: sl st into 1st and 2nd st, ch 3, dc in next 5 sts, sk last st (6 dc).

Row 9: ch 3, turn 1 dc in next 5 sts (6 dc).

Row 10: ch 3, turn, 1 dc in same st, 1 dc in next 4 sts, 2 dc in last (8 dc).

Row 11-13: ch 3, turn, 1 dc in same st, 1 dc in each st across the row, and 2 dc in last st (row 11 - 10 sts, row 12 - 12 sts, row 13 - 14 sts).


Front Panel:
To Begin: ch 6

Row 1: dc in 4th ch from hk, dc in next 2 sts (4 dc).

Row 2: ch 3, turn, 2 dc in 1st st, dc in next 2 sts, 3 dc in last st (8 dc).

Row 3: ch 3, turn, dc in each st across (8 dc).

Row 4: sl st 1st and 2nd st, ch 3, dc in next 5 sts, sk last (6 dc).

Row 5: ch 3, turn, 1 dc in same st, 1 dc in next 4 sts, 2 dc in last st (8 dc).

Row 6: ch 3, turn, 1 dc in each st across (8 dc).

Row 7: sl st into 1st, 2nd and 3rd st, ch 3, 1 dc in next 3 sts, sk last 2 sts (4 dc).

Row 8: ch 3, turn, 2 dc in same st, 1 dc in next 2 sts, 3 dc in last st (8 dc).

Row 9: ch 3, turn, 1 dc in each st across (8 dc).

Row 10: sl st in 1st, 2nd and 3rd st, ch 3, work 1 dc in next 3 sts, sk last 2 sts (4 dc).

Row 11: ch 3, turn, 1 dc in same st, 1 dc in next 2 sts, 2 dc in last st (6 dc).

Row 12: ch 3, turn, 1 dc in each st across (6 dc).

Row 13: sl st in 1st and 2nd st, ch 3, 1 dc in next 3 sts, sk last st (4 dc).

Row 14: ch 3, 2 dc in same st, 1 dc in next 2 st, 3 dc in last st (8 dc).

Row 15: ch 3, 1 dc in each st across (8 dc).

Row 16: ch 3, turn, dc in same st, 1 dc in next 6 sts, 2 dc in last st (10 dc).

Row 17: sl st in 1st, 2nd and 3rd st, ch 3, 1 dc in next 5 sts, sk last 2 sts (6 dc).

How to Create Ribs, Collar & Arm Strap:
To Begin: Slip knot, ch 5.
Row 1: Work dc in 4th ch, work dc in last ch (3 dc).
Row 2: ch 3, turn, work dc in next 2 sts (3 dc).
Row 3: and on - repeat instructions for row 2.
Ribs:
Make 2 of each piece except the collar piece.
The sizes listed below are: XS (S/M, L/XL, 2XL/ 3XL, 4XL/5XL) and the numbers indicate how many rows should be worked to ensure that your piece is the proper size.
Front // Make 2 of each:
1st Rib: 8 rows (10, 13, 16, 19).
2nd Rib: 10 rows (12, 15, 18, 21).
3rd Rib: 11 rows (13, 16, 19, 22).
4th Rib: 13 rows (15, 18, 21, 24).
5th rib: 16 rows (18, 21, 24, 27, 30).
6th rib: 16 rows (18, 21, 24, 27, 30).
Back // Make 2 of each:
1st Rib: 8 rows (10, 13, 16, 19).
Arm Straps:
22 rows (24, 26, 28, 30).
Collar:
49 Rows (51, 54, 57, 60).
Connecting Everything Together:
All pieces are sewn together using an invisible stitch. All rows are counted from the top-down.
Front Panel:
Connect 1st Ribs to Row 2, 2nd Ribs to Row 4, 3rd Rib to Row 6, 4th Rib to Row 8, 5th Rib to Row 10th, 6th Ribs to Row 13.


Front Panel Ribs to Arm Strap:
Fold arm strap in half and sew both ends together. Connect 1st Rib to Row 2, 2nd Rib to Row 6, and 3rd Rib to Row 8.

Back Panel:
Connect 1st Ribs to Row 2.


Connecting Back Panel Ribs to Arm Strap:
Connect 1st Ribs to Row 2.


Connecting Front Panel to Back Panel:
Connect 4th Ribs to Row 7, 5th Ribs to Row 9, & 6th Ribs to Row 11.

Connecting the Collar to the Harness:
Fold collar in half and sew ends together. Sew collar to the top of the front panel, back panel and 3 rows along the top of the arm straps.


Terms and Conditions of Pattern:
This pattern was made to be used by individual crocheters and small businesses. Feel free to make and sell them at craft fairs. I do not allow mass production of my designs.
Join me on Social Media
If you make this piece and post it online I would love to see! Tag me @cactusladycreation. Also feel free to send to a friend or two that you think would like it as well!
🥀 I hope you've enjoyed creating this pattern with me. If you did please let me know in the comments below!
For more crochet inspiration and tutorials, join our community by subscribing to my YouTube Channel. Every Tuesday and occasionally on Thursdays and Saturdays, I share new content and I would love for you to be a part of it!
📸 If you post your creation online, feel free to tag me at @cactusladycreation on social media platforms and use the hashtag #consciouscraftingcommunity! I would love to share your work with our growing community!
🖤 Thanks for stitching along and I hope to have you crafting along in the next one!
@cactusladycreation